|
In
this section, we will describe some technical points about the creation
of a DVD.
Process
of DVD Creation :
acquisition
of video source (DV, VHS, SVHS, Super 8,analogic, digital)
ameliorate the video file with filters
editing the video file
compress the video in DVD format
DVD authoring
Burning the DVD
|
AQUISITION
OF THE VIDEO
|
 |
This
is an important step of the DVD creation.
The quality of a DVD depend on the quality of the video sources.
It will be too bad if you have good quality video sources and that the
result is bad quality on the DVD.
You need for this task a video capture card. There are a lot of different
video
capture card. Depend on what you want to do and the money you want to
put, you will choose
one. Matrox, Dazzle, Canopus, Pinnacle are the most famous companies.
Depend on wich sources and what you want to do, you will choose your
video card. Here are some
parameters for choosing your card :
1) analogic or digital video sources
2) video system for your sources :SECAM (France) , PAL (Europe), NTSC
(USA)
3) External or Internal Video Aquisition system
4) Compression in real-time or not
5) Type of input : Composite, S-Video, FireWire
6) Output : Composite, S-Video, FireWire
7) Resolution of Video (720*576 DVD PAL, 720*480 DVD NTSC)
8) Sotware include in package
For
making my DVD, we use Pinnacle DC10+ wich works fine and give good result
and a firewire card for DV sources. Depend on yout video card, you will
need a software
to do the aquisition : with our card Pinnacle DC10+, Studio 8.1 was
included and we use
this software to make the acquisition. But most of video editing software
can be used to make
the acquisition like Adobe Première®.
Once
you have made the video acquisition you will have a AVI file
( or MPEG file if you have a real-time MPEG2 compression ). This AVI
file is generally a
video file wich is compressed by what we call a CODEC ( COmpression
- DECompression ).
There are a lot of different AVI CODECs, by default on Microsoft Windows,
you have some codecs like Indeo or Cinepack Radius ...
These codecs allows a size of video file smaller with the same quality.
Depend on the codec,
the size/quality rapport will not be the same. With the pinnacle DC10+,
we have a MJPEG Pinnacle Codec.
We use also the PICVIDEO MJPEG codec.
|
AMELIORATE
THE VIDEO WITH FILTER
|
|
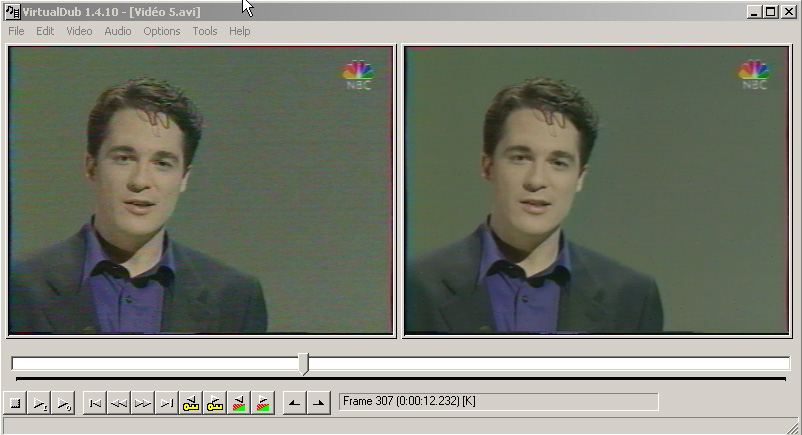
With
your AVI file, you can ameliorate the quality of your video file. Most
of video editing software
have their own video filter but you can find on the web a lot of video
filter developed by independant
people. To apply filter on video file, we use VIRTUALDUB wich is a free
tool. On the Web, you can
easely find a lot of free video filters for VIRTUALDUB.
Here is a example of ameliorating a video with a VIRTUALDUB filter :
For
more details, see on VIRTUALDUB WebSite. http://www.virtualdub.org/
|
EDITING
THE VIDEO FILE
|
|
Once
you have your AVI file, or maybe several from different aquisition,
you will now start
the video editing. What is video editing :
1) merge or cut AVI file
2) add title, effect on video
3) add transition between AVI files
4) fade in or fade out etc ...
This operation is too create your definitive video before the compression.
In our opinion, this is
an artistic step in the DVD creation process, with lot of video editing
software, you can add or
apply a lot of effects, transition, title, subtitle ...... The most
wellknown sofware are FinalCutPro
for Mac and Adobe Premiere® for windows. For more details about
video editing, see the website
of video editing software like Adobe.
We use Adobe Premiere® and Pinnacle Studio 8 for our DVD.
|
COMPRESS
THE VIDEO FILE IN DVD FORMAT
|
|
After
the video editing, you have now to compress your video file into DVD
compatible format.
A DVD compatible video file is a MPEG2 file (for the VCD, this MPEG1
file).
This is a very important step : the compression MPEG2 has many parameters
that will
change the quality of your DVD. One of the most important parameter
is what we call BITRATE.
The bitrate indicate the video information quantity during a period
: Kb/s.
Of course higher is the bitrate, higher is the quality because most
information is giving during
one second for example. But higher is the bitrate higher is the size
of a MPEG2 file.
This is a reason why you have to know the total time of your DVD before
compress the video.
A DVD-R contain 4.7Go. If you choose a high bitrate , the size of your
video file you be bigger
that the capacity of a DVD. That why you have to calculate your bitrate
in function of the total time
of video you want to put on your DVD-R. Just for information :
|
Bitrate
|
Time
on 4.7Go DVD-R
|
|
4000
Kb/s
|
120
minutes
|
|
6000
Kb/s
|
90
minutes
|
|
4000
Kb/s
|
60
minutes
|
Another
concern for the bitrate is the bitrate himself : you have two possibilities
:
1) a constant bitrate : the bitrate is the same during all the video
2) a variable bitrate : the bitrate changed from a minimal value to
a maximal value
depending of complexity of the video frames ( mouvment, color ...)
The
variable bitrate allows you a smaller file for a longer time of video.
But this is a little
bit more difficult to parameter : number of passes, pixel .....
After
the bitrate you have the video size : for DVD :
720*576 for PAL, 720*480 for NTSC
And
the last thing is the sound. There are different formats for the sound
: PCM, AC3 ..
AC3 allows Dolby Digital 2.0, 5.1 DVD sound. PCM is a simple format,
2.0.
You can find tool for creating AC3 file.
Most of video editing software can compress into MPEG2,
but with sensible difference quality depending on the MPEG2 codec.
Pinnacle use their own MPEG2 codec, Adobe Premiere® 6.5 use Main
Concept Codec.
WeI don't have any knowledge with other MPEG2 codec. Both are good codec.If
you don't know wich parameters to use, most of video editing software
have DVD format
compression template with the good parameters.
Once
you decided all your parameters you start the compression.
The time of compression depend on your processor !!!! But it take a
lot of time :
wiht a 1200 Mhz processor, 7200tr/mn hard disk,
it takes 8 hours for 2 hours of video.
For compression, we use TMPGENC, Adobe Permière®, Pinnacle
Studio 8.
|
DVD
AUTHORING
|
|
The
DVD authoring is the most artistic step in the creation of DVD. The
DVD authoring consist in
the structure of your DVD. For example, the first video played, wich
video after another video,
the creation of the diiferent menus, background music ....
There are a lot of different DVD authoring software, some are very simple
with pre-build menu, and
some others are very complex. Of course, more complex is your DVD authoring
software, bigger
are your possibility in menu, animation and so on. A very simple software
that we use at
the start is ULEAD DVD WORKSHOP. Now we are using DVD Maestro Sprice
Up wich is more
complex, but give more wonderfull and nice DVD !!!!
We create the menus with ADOBE PHOTOSHOP 6 and some animation with ADOBE
AFTERS EFFECTS 5.5.
Once you have defined the structure of your DVD in your DVD authoring
software, you just have to compile it. You will have two folders :
AUDIO_TS and VIDEO_TS
The video_ts folder contain vob, ifo, bup files.
|
BURNING
THE DVD
|
|
Once
yuo have your two folders, you just have now to burn your DVD like a
CD, choosing
DVD video files, the the two folders VIDEO_TS and AUDIO_TS and start
the burning.
We use a PIONEER A104 DVD-R burner. It takes 45 minutes to burn a complete
DVD.
The software to burn is NERO BURNING 5.9.9.14.
And after, if your home DVD allows it, you can play it and enjoy it
!!!!!!!!!!!!!!!
SOFTWARE
WE USE :
STUDIO
8 Pinnacle
ADOBE PREMIERE 6.5
TMPGENC 2.58.44.152 Plus
PICVIDEO MJPEG CODEC
VIRTUALDUB 1.4.10
ADOBE AFTER EFFECTS 5.5
ADOBE PHOTOSHOP 7
NERO BURNING 5.9.9.14
DVD MAESTRO
|